Monday, March 24, 2014

Wonderful New Beginnings

“A new baby is like the beginning of all things - wonder, hope, a dream of possibilities.” - Eda J LeShan
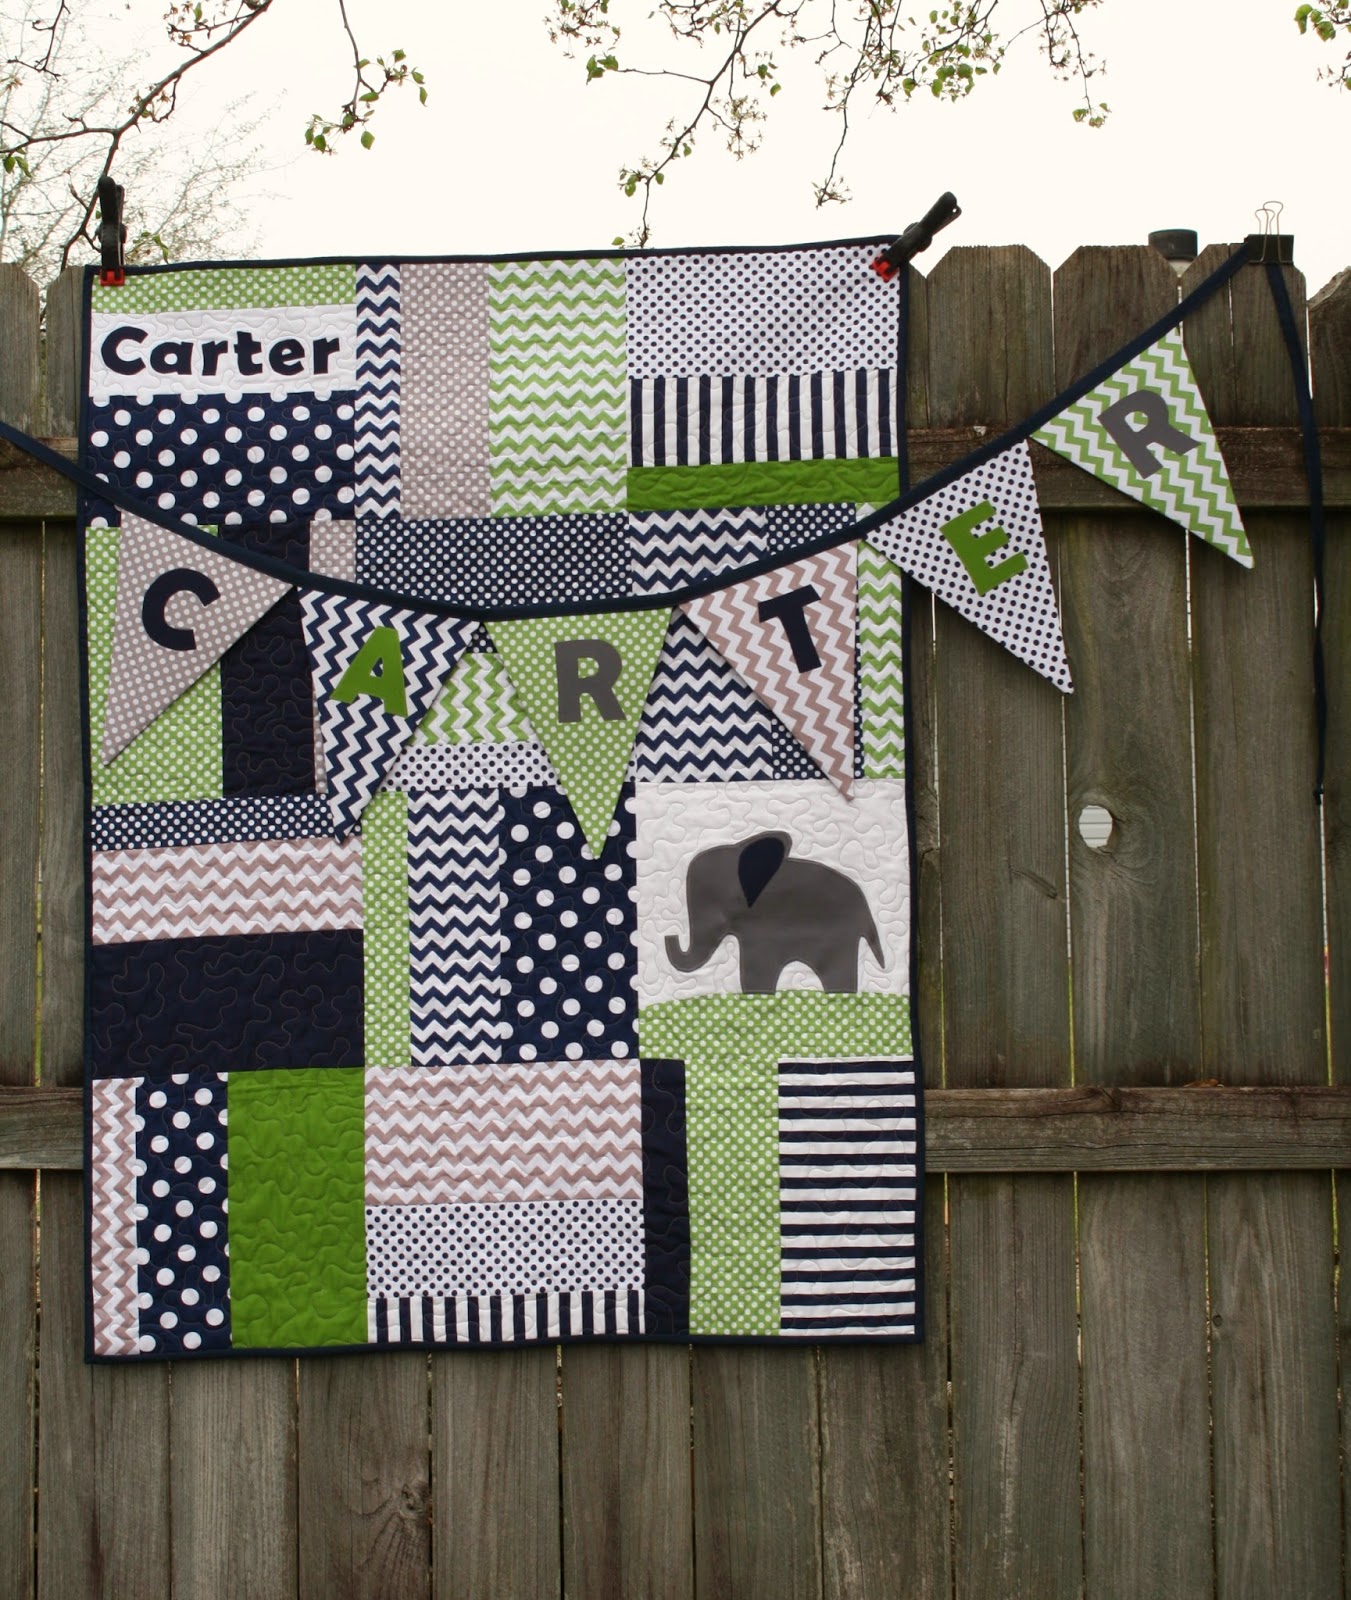


My dear friends have a baby boy on the way, such a great blessing for a very deserving couple!! I wanted to make something they could enjoy and celebrate with their new baby.  I had to keep it a secret as the new momma-to-be watches my posts, but now that the baby shower is over I can share :)


Carter's quilt was made using Amanda of Jedi Craft Girl's Monster Truck Quilt Tutorial. Her tutorial is perfect! It was quick and easy, and so cute too! The finished measurements on this quilt is 36" by 48". I used the 12.5" blocks (12" finished) in a 3 by 4 layout, total blocks used were 12. Instead of a monster truck, I went with a cute elephant applique very similar to the couples nursery decorations. I found the applique at Sew4Home's post 'Super Cute Animal Applique Pillows'.


The nursery colors are navy, green, gray and taupe. Which made this a great quilt to use Riley Blake's chevrons and dots fabric prints, along with Kona navy, ash (gray) and green. I use a raw-edge applique technique for his name and the cute elephant, and stitched down with a simple zigzag stitch. It is quilted with a simple meandering quilting design with gray thread.


For the banner/bunting I also used raw edge applique and the same fabrics as in the quilt.


Using Noodlehead's Divided Basket pattern and fabric scraps from the quilt, I finished up this cute fabric basket just in time. I highly recommend the Divided Basket pattern - great instructions and very well written!


I love all the room in there!!


And also to add in the basket - 5 burp cloths and a flannel receiving blanket.  Had a wonderful time at the baby shower and the couple love all the gifts they received. Looking forward to meeting Carter!! xoxo

~A baby will make love stronger, days shorter, nights longer, bankroll smaller, home happier, clothes shabbier, the past forgotten, and the future worth living for.~ Anonymous 

Monday, March 17, 2014

How I Create Diagrams for Tutorials in MS Paint


Recently I was asked how I create the diagrams I use in the tutorials I make here and for the ECMQG blog lottery block tutorials. The answer is kind of funny but I use the basic old program that comes with just about every Windows based computer - Paint. This is a very quick tutorial of MS Paint - if you have any questions please let me know I would be glad to answer them.

MS Paint is a very basic drawing program, and while it won't do what other more advanced programs will, you can learn to use it when needed.

With Paint you build from the bottom up as Paint doesn't have 'layers' like more advanced programs. The trick is to save as you go, but save different versions just in case you change your mind, and the last change is not what you wanted. **Also when saving make sure to use .jpg file extension which is easier to use in other programs.


I will walk you through how I created this diagram for cutting squares for a block tutorial.

Open up Paint

Make sure the working area is the size you need it, the bigger the better! You can crop away excess later. To make the work area larger left click and hold the bottom right corner and stretch. 


Next I clicked on the shapes rectangle tool (it makes squares too) and made sure I have selected the color 1 as black (you see it highlighted in orange in the picture below).


To the right of the shape tools there is the size box, if you click on the arrow a drop down box appears and you can change the line thickness. 


To create the square left click and hold then move the cursor until you are happy with the square size and shape. You can always click the return arrow in the upper left hand corner and start over.


Now to make the 'red' cutting line, click on the shape tool that looks like a line. Also select color 1 as red and choose your line thickness.


Just like creating the square, I used left click/hold with the cursor starting in the bottom left of the square at the corner and and dragging to the upper right corner to draw the line from one corner to the other. Again if it is not where you like it you can always click the return arrow to start over.


At this point I save it with a generic name. That way I can work on it and if I happen to make a mistake I can go back to the original and start over.

Now to make the text.


You want to click on the 'Text' tool to select it and click on your choice of text color by selecting color 1.

Again left click hold and drag to create a text window or box. 


Above you can see after you have created a text box the text tools open up - this is where you can change the font and size.


After choosing the font and text size, enter ythe text. **Do not click outside this text box, if you do you will not be able to edit the text anymore. (Paint does not have spell check so carefully check your spelling) 


As long as the box is open you can edit the text, you can move the text box and add to it. Once you have the text where you want it click outside the box and it is now locked into the picture.


Continue to add text or shapes until you have the picture the way you would like. Save again at this point.

Now let's crop it to a manageable size, select 'Select' -- yes my bad, but its funny :)


And place your cursor at the top left of the area you want to keep. If the dotted outline is not where you want it to be just click somewhere out side the selected area and start over. 


When you have the area selected, go back to the tool bar and select 'Crop'.

Save and use.


Now go have fun in Paint, play around and learn what a simple basic free program can do :)

Friday, February 28, 2014

A Liebster Award

Hey everyone! Wendi from prsd4tim2 nominated my blog for a Leibster Award recently. Blogger awards are such a great way to learn more about your fellow bloggers so I knew I had to participate. 


The Liebster Award is given to up and coming bloggers who have less than 200 followers. So, what is a Liebster?  The meaning: Liebster is German and means sweetest, kindest, nicest, dearest, beloved, lovely, kind, pleasant, valued, cute, endearing, and welcome. Isn't that sweet? Blogging is about building a community and it's a great way to connect with other bloggers and help spread the word about newer bloggers/blogs.


I enjoyed getting to know more about Wendi, and I will answer these questions she has sent to me so you can get to know more about me too!

1. Why did you start blogging? Well, I didn't have any friends that enjoyed quilting and sewing so I started blogging as an outreach to other quilters. I also like sharing knowledge and the blog lets me do this. 

2. What is something this year that you are really looking forward to? Totally nothing to do with quilting - My son's graduation this coming May and the fact that he is going to continue his education and be the first in my family with a Masters Degree.


3. What is your favorite thing to do to unwind? Sewing, quilting and camping but also lounging on the couch surrounded by my three dogs - Guils, Ripley and Tessa.


4. Photo's say a thousand words so share a photo that means the most to you. Why is that picture important to you? It's a picture of my son when he was just 6 years old, it was taken on the roof of the Duomo in Milan. We lived in Northern Italy for 3 years, just minutes from Lake Garda. My husband was active duty in the USAF at the time and we were stationed at Ghedi Air Base (an Italian Air Base). In those three years we experienced life as an Italian. We lived on the economy and learned as much as we could about the area. We loved every moment!!


5. What quote inspires you the most? My grandfather once told me "Always do your best, even if your digging a ditch make sure to dig the best ditch you have ever dug".  So no matter how small or insignificant what you are doing might seem, do it with pride! He was a country boy and grew up in poverty in the south, but he was the most hardworking, forgiving, kindest, sweetest, loving man I have ever known!

6. Name a quilting tool you can’t live without & why? A 6" by 12" rotary cutting ruler, I use it all the time. Recently I misplaced it and had the hardest time cutting fabric with the other rulers I have. I ran right out and bought a new one.

7. Where is your favorite vacation spot? Anywhere camping! We love to camp and have a tiny little camper called Itty Bitty. Usually we camp quite a few times a year and love being outdoors in nature.


8. What is your favorite blog? This is a hard one! I can't possibly choose just one, I love all the blogs I subscribe to (through bloglovin) and don't believe one is better than the other, each blogger shares their insight and knowledge. Just like the individuals that write the blogs, each blog is wonderful in its own way!

9. What is your favorite way to work out? Oh, boy do I have to answer this - Really?!   I use to lift weights and run, but haven't been at it for a while. I do miss running, it was such an escape. I really need to get my bum in gear and get back at it!

10. Where do you like to shop? Well, that depends... Fabric? um.. Lots of places! Brick and  Mortar stores: A&E in Pensacola (divine selection) and Lynn's in FWB. Online: Westwood Acres, Fat Quarter Shop, Hawthorn Threads, Fabric Depot, the list goes on and on.

11. What's the best advice you've ever been given? My best friend once told me something her dad said "Words are like a tube of toothpaste." Which makes complete sense to me because once you say the words (hurtful and unkind) you can never take them back - so be kind with your words!!

Now to nominate some fellow bloggers :)


 Ok bloggers now its your turn to answer some questions
1. Why did you start blogging? 
2. What is something this year that you are really looking forward to?
3. What is your favorite thing to do to unwind?
4. Photo's say a thousand words so share a photo that means the most to you. Why is that picture important to you?
5. What quote inspires you the most?
6. Name a quilting tool you can’t live without & why?
7. Where is your favorite vacation spot?
9. What is your favorite way to work out?
10. Where do you like to shop?
11. What's the best advice you've ever been given?

Oh and don't forget to stop by Wendi's blog Prsd4tim2 and say 'Hi'! She is so talented and I love reading her blog!!

Monday, February 17, 2014

Design Wall At Last!

Design Wall by LaBellaColori Kira Bell


This past weekend my husband and I finally made a design wall for the quilt room. I have been wanting to do this ever since we moved in our home. I did a lot of research and found many different tutorials and examples. It's fun looking at all the other design walls out there, just google 'quilt design wall'. There are simple ones made by just tacking up a felt backed table cloth or felt to you wall to extreme design walls made with MDF and power outlets cut out.


We decided to go with affordable polystyrene foam insulation sheets that we found at Lowe's for just under $10.00 each. They are light weight 8 feet by 4 feet and 1/2 inch thick, one side is white the other silver with manufactures information printed on it. The room is about 11' x 10' and one wall where the long arm quilting machine is was the perfect place to make into a large design wall.

On the wall that is 11 feet wide we could easily fit the 8 foot length of the polystyrene. I wanted more than 4 feet tall so we took one of the sheets of polystyrene we cut length wise down to 2 foot wide. This made the design wall 6 feet tall and 8 feet wide. Not quite the whole wall but pretty big indeed!


Using spray adhesive we glued quilt batting to the white sides - this is important because the print on the other side would show through the batting and make an ugly design wall! Don't do what I did and leave one of the scanner stickers on under the batting, I promise it will show through the batting!

Once batting is on the main side we flipped it over trimmed the excess batting down to two inches and glued it to the back. We did this for both pieces. We could have duck taped the two together before covering with batting but for easier installation we left the two sheets separate. 


Once the two sheets are covered with batting we placed the 2' strip down first using 3M command strips stuck to the back of the polystyrene and made sure it was level and pressed it onto the wall. Then added the 4' wide sheet also with the 3M command strips.

Design Wall by LaBellaColori

And there you have it - one really awesome design wall!

Wednesday, February 12, 2014

Fun with Tutorials!

I thought after the first of the year that everything would slow down, but no. Just like everyone knows more things end up on the 'to do' list! But I can't complain because I am loving it all!! Doing more of the creative things I love to do.

I volunteered for the Emerald Coast Modern Quilt Guild Block Lottery and became the official Block Lottery Captain in January; and what an honor it is! I get to design and test block patterns for the guild. Check out our block for the March meeting...


I was really fun to sew up and easy too! The block lottery is a great way for our guild to raise funds, but it is also a way to learn new quilting skills or push yourself to use fabrics you might not have ever chosen. It is a free tutorial every month for anyone to use, even if your not a guild member it's avalable. I hope that these tutorials are helpful, educating and fun!!

The past two blocks were...


I am looking forward to future months!! I already have some great ideas ready.

Also I plan on making each one of these blocks to keep and then at the end of the year create a sampler quilt from them. I have a bundle of Denise Schmidt Chicopee and a nice bundle of low volumes I plan on using, the Chicopee just makes me smile so I think that will be my happy sampler quilt - finally some selfish sewing :)

So please if you see a block tutorial on the Emerald Coast Modern Quilt Guild Blog you like, by all means make some!! And please send me a pic I would love to see it!
Related Posts with Thumbnails