Showing posts with label Quilting. Show all posts

Monday, August 15, 2016

'It' and the Dare to Doodle

Yea, I have seen the blogs, looked over the tutorials and read the books (oh so many books) that say "Get a dry erase board and doodle. It will help you to learn good eye hand coordination and improve your quilting skills." I ignored that advice. I made excuses like "its not really like actually quilting", "I am not good at drawing things", and "it can't possibly help me, its just silly".

Until, one day during a back to school sale I picked up this 'thing'.


Scary? YES! You mean I have to use it?

When I arrived home that day I walked in the house and leaned it up against the guest room wall still wrapped in its plastic, and scurried away quickly as if it was taunting me! Telling me I was not good enough, I had no right to think I could handle the failure and disappointments I might make upon its pristine glistening white face.


Weeks went by, then months. Every time I passed the guest room I could hear it, still taunting me. One day while sitting in the living room visiting with family I was asked to draw out examples of my quilting, to which I quickly changed the subject. Later that evening and after a few glasses of wine I summoned up my courage and marched into the guest room. Before 'it' could utter a word, I tore away the plastic wrapping, wadded it up and tossed it on the floor. I sat on the guest bed and pulled the cap of the pen off and wrote this:

You Will Not Defeat Me 
I will over come this fear!


I doodled swirls and I swear I thought I heard giggling. Quiet taunting laughter as if my sad crooked jerky swirls were a joke. I used my sleeve and wiped the swirls away, it got quiet again. I drew more swirls and more and more swirls, until the evil whispering laughter ended. I put the dry erase board away in my quilting room. It's shiny white face silently glared at me.

The next time I went to use 'it' the pen was missing. A large emotional search was conducted, blankets tossed, dresser drawer contents emptied, and accusations were made. Eventually the said pen was found, under the couch broken into three pieces. The battle wounds could clearly be seen, and the guilty party identified - Ripley! My sweet little doxie girl had killed the pen. So off to the store were I purchased a multi pack of dry erase pens in many colors (ya know I love me some color in my life).


Now I doodled and practiced every free moment I had, and like training a wild mustang each time I doodled on the dry erase board we got to know each other. I knew if I didn't like what I saw, I could simply erase it and start over. 'It' learned to trust me, to understand I was honing my skills as a quilter. Together we created, practiced and experimented with new designs harmoniously.


What does this silly little story mean, you may ask? 

It was all in my head, all the evil voices and laughter were simply me and my doubt. The fear of trying and failing, that is all it was. I was intimidated by seeing my mistakes, but you have to make mistakes to learn to get better, right? What a extreme moment of insight!

If you want to quilt and want to get better at it - GET A DRY ERASE BOARD!
It doesn't matter whether you want to quilt on your domestic home sewing machine, a mid-arm or a long-arm get one ASAP!

Practice and doodle and if you don't like what you see, just wipe it away. If you like what you see, take a picture and save it. Do it over and over and over again!!

'It' is now affectionately named William, but I call him Will - yes my Will!

So, tell me what is your excuse??


Tuesday, September 29, 2015

Fun Quilting on a Sunday

Sunday I had the pleasure of quilting a baby boy quilt for a new client.


The quilt was an adorable Dresden Plate quilt with the cutest jungle print fabric.


Is that giraffe not the cutest thing you ever saw?!


She wanted the Dresden plates slightly outlined, small meandering in the white areas and a free-motion leaves in the outer boarder.


I really had a blast quilting this adorable baby quilt and know that some little guy is going to love it!

Happy Quilting,
Kira

Thursday, December 11, 2014

Modern Low Volume vs Traditional Quilting Neutrals


Low Volume fabrics have become very popular in the modern quilting world and while there are many different opinions on what is or isn't Modern Low Volume, I thought I'd take a moment and talk about low volume prints and how they differ from Traditional Quilting Neutrals.

When I first saw a quilt using Modern Low Volume fabrics I thought "Wow, what a great idea. So fresh and modern". But as the wave of quilts and fabric bundles have come out I also have noticed that many new quilters are still confused as to what Modern Low Volume fabrics are.

From here on I will refer to Modern Low Volume fabric as MLV and Traditional Quilting Neutrals as TQN.


Traditional Quilting Neutrals


Photo credit - Keepsake Quilting Butter Churn bundle

I think I need to explain first what TQN fabrics are, or at least what I think they are. 

I made this quilt many years ago in Civil War Repros.

Back in the day (yuck that makes me sound old) - when I first started quilting I was a traditional quilter, I used Civil War reproduction fabrics, 1930's reproduction fabrics, muddy colors and lots of beige. 


A baby quilt I made as a gift in 1930's repro.

I used a lot of what was called Neutrals or now called TQN fabrics for backgrounds. I  loved them at the time, and the simple truth is that was all we had available for background fabrics other than the typical solid fabric or muslin.

Traditional Quilting Neutrals

Above is an example of TQN fabrics commonly used in traditional quilts as background fabrics. TQN are usually tone on tone prints ranging from off-white to beige with a warm tone to them.

Example of TQN used in the background. I made this quilt as a challenge to use all stash and scrap fabrics. 

Most TQN have little to no color other than the cream to beige range, although they can have a little color in them - small amounts and very subtle.

Mini Log Cabin Heart quilt made using TQN.

While the quilts above are beautiful, they say to me 'Traditional' as opposed to 'Modern'. I can appreciate a traditional quilt just as much as I can appreciate an 'Art' quilt or 'Modern' quilt! And it doesn't hurt my feelings if you call them traditional, because I understand the concept between Modern vs Traditional. (and those are my traditional quilts I am showing above :)


Modern Low Volume Prints

With the Modern and Modern-Traditionalism quilt movement came the use of modern prints for background fabrics and thus created the MLV trend.


MLV fabrics are often graphic prints with white or light gray backgrounds, and can contain color.


The MLV fabric use was slowly building until the book 'Sunday Morning Quilts: 16 Modern Scrap Projects' by Amanda Jean Nybery and Cheryl Arkison was published, then the quilting world exploded with MLV fabric bundles and projects.


Photo credit - Westwood Acres Inside Voices Club


MLV fabrics are bright and clean as opposed to the TQN that are more muted and warm in tone. When looking for MLV fabrics look for graphic prints on white or very light background.

Riley Blake's Geekly Chic Glasses on off-white
I try and stay away from fabrics with a cream or beige background that has very little contrast or no color. With the exception of graphic prints on off-white backgrounds. Sometimes you will come across MLV fabrics with a muted background like the example above. Riley Blake's Geekly Chic Glass fabric in off-white is a modern graphic print and an excellent MLV.

Tailored Key by Annette Tatum for Free Spirit

Annette Tatum's fabric 'Tailored - Key' for Free Spirit graphic print with royal blue on a crisp white background is a great example of a MLV fabric. Using a bold color in a tiny print that is toned down with the white background.

Posy by Aneel Hoey

'Posy' by Aneel Hoey is another example of a MLV fabric, a whimsical print with a white background and small doses of color. 


While just about any pale modern print fabric can be classified as a MLV, it is more about the use in a modern quilt for the overall visual effect.

Photo credit - Film in the Frig's quilt Marcelle Plus 

In the Marcelle Plus quilt by 'Film in the Fridge', Ashley Newcomb uses many MLV fabrics for the background and bold color prints for the pluses. The bold color prints stand out but play nicely against the MLV fabrics. Your eye is drawn to the pluses and the MLV blend into the background.


This lovely low volume quilt was made by Rita Hodge of 'Red Pepper Quilts'  she uses all MLV fabrics here. In this quilt she lets the low volume fabrics sing, and though some may stand out more than others, this quilt has a calming feel to it.


Mod Pop by Anne Sullivan of Play-Crafts

Mod Pop by Anne Sullivan of Play-Crafts is a wonderful example of MLV in tones of light gray and bright bold blue prints. Not only a very modern use of fabric but a very modern design.


Pillow Tutorial by Amanda of A Crafty Fox

Amanda from 'A Crafty Fox' created this pillow pattern and tutorial using MLV, bold colorful prints and Essex linen. Again a great example of using MLV fabrics to make the bold colors pop - the orange hexagons are the first thing you see.


Here in 'Her Light Within' a mini quilt, I used a few MLV prints in two quarters of the large sun to contrast the stark white, orange and aqua prints.

Both MLV and TQN have been used as backgrounds in quilts and both are equally beautiful, yet they have totally different aesthetics and create an overall different visual outcome.

Hopefully I may have helped you and not added to the confusion of the question 'What is a low volume fabric?'.

Will I make more quilts with TQN? Of course! Will I make more quilts with MLV? You can bet on that!!

xoxo,
Kira

PS - all the spelling and grammar errors are free of charge ;)
(I am a notoriously horrible English student)

Monday, March 24, 2014

Wonderful New Beginnings

“A new baby is like the beginning of all things - wonder, hope, a dream of possibilities.” - Eda J LeShan


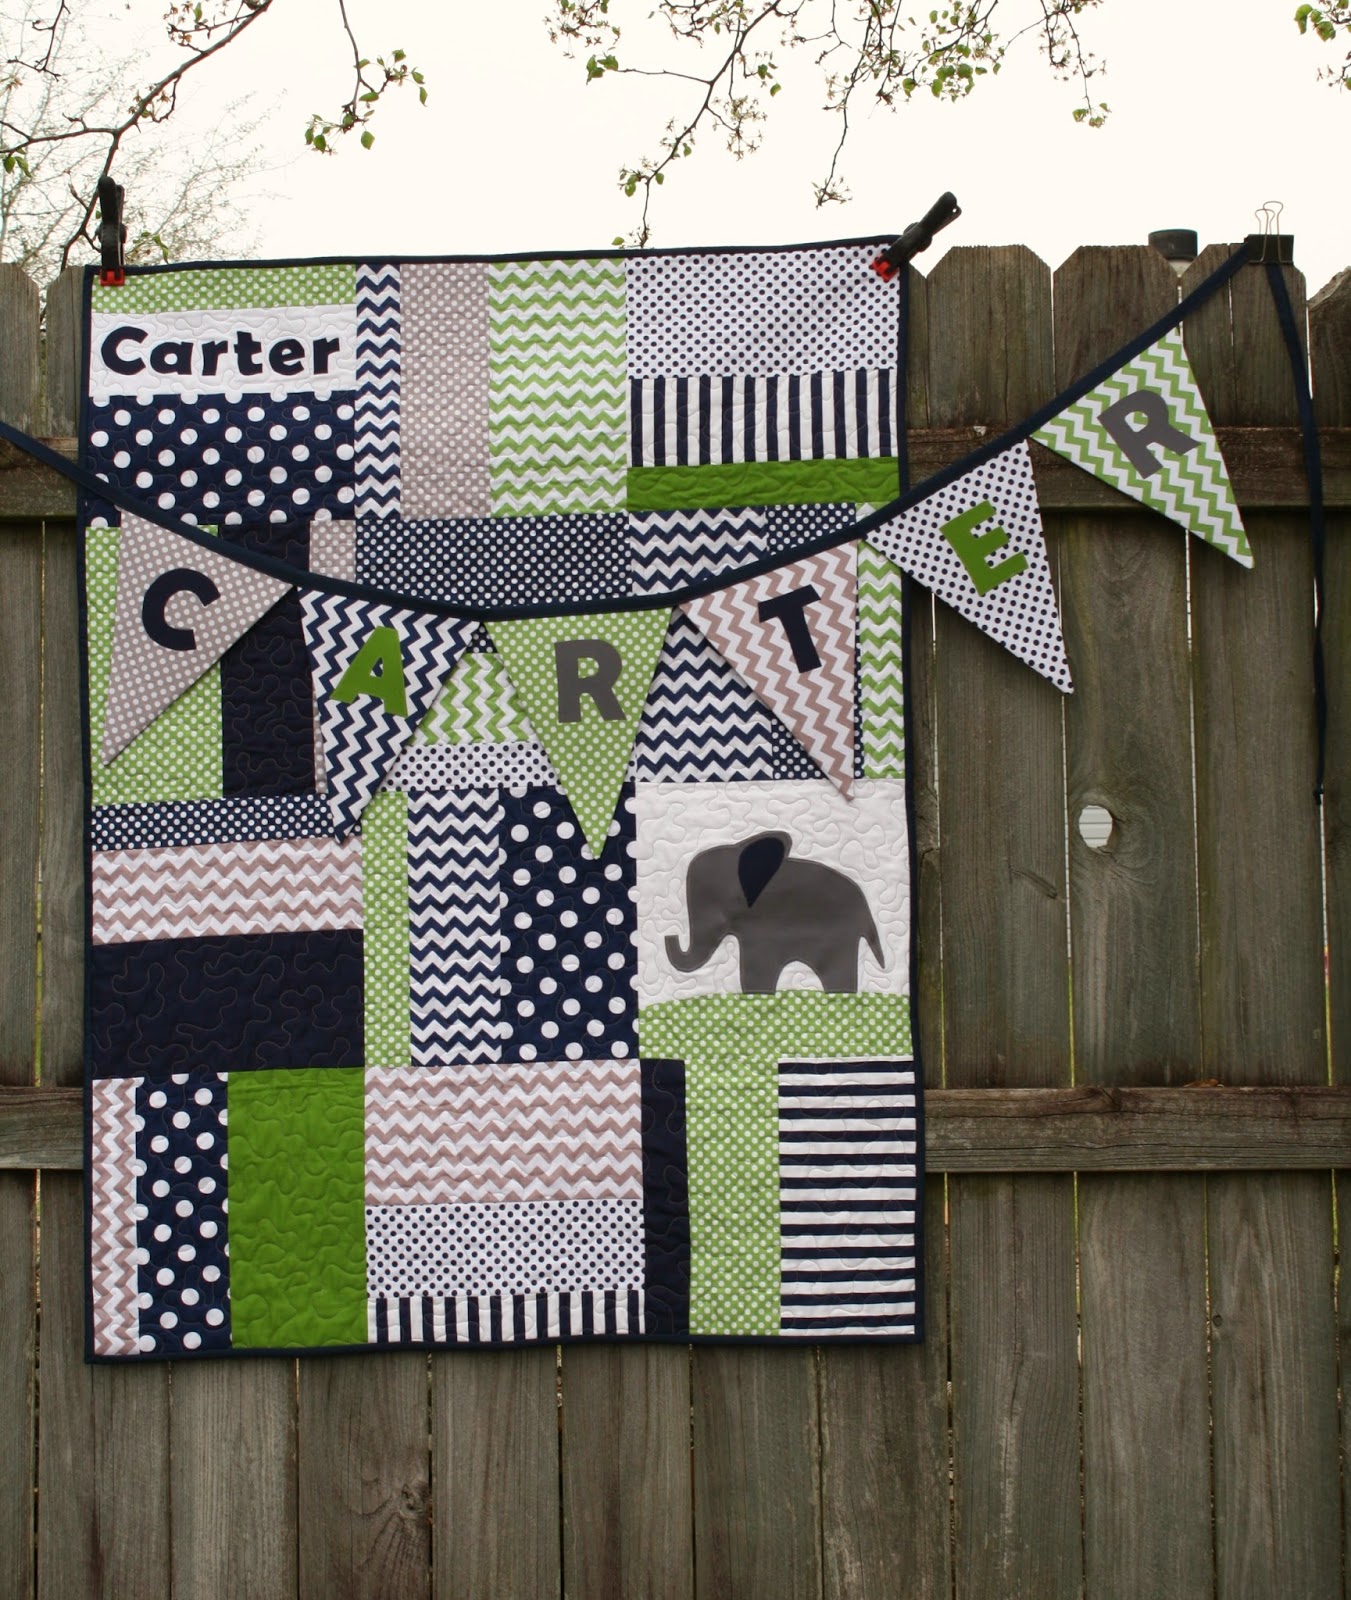
My dear friends have a baby boy on the way, such a great blessing for a very deserving couple!! I wanted to make something they could enjoy and celebrate with their new baby.  I had to keep it a secret as the new momma-to-be watches my posts, but now that the baby shower is over I can share :)


Carter's quilt was made using Amanda of Jedi Craft Girl's Monster Truck Quilt Tutorial. Her tutorial is perfect! It was quick and easy, and so cute too! The finished measurements on this quilt is 36" by 48". I used the 12.5" blocks (12" finished) in a 3 by 4 layout, total blocks used were 12. Instead of a monster truck, I went with a cute elephant applique very similar to the couples nursery decorations. I found the applique at Sew4Home's post 'Super Cute Animal Applique Pillows'.


The nursery colors are navy, green, gray and taupe. Which made this a great quilt to use Riley Blake's chevrons and dots fabric prints, along with Kona navy, ash (gray) and green. I use a raw-edge applique technique for his name and the cute elephant, and stitched down with a simple zigzag stitch. It is quilted with a simple meandering quilting design with gray thread.


For the banner/bunting I also used raw edge applique and the same fabrics as in the quilt.


Using Noodlehead's Divided Basket pattern and fabric scraps from the quilt, I finished up this cute fabric basket just in time. I highly recommend the Divided Basket pattern - great instructions and very well written!


I love all the room in there!!


And also to add in the basket - 5 burp cloths and a flannel receiving blanket.  Had a wonderful time at the baby shower and the couple love all the gifts they received. Looking forward to meeting Carter!! xoxo

~A baby will make love stronger, days shorter, nights longer, bankroll smaller, home happier, clothes shabbier, the past forgotten, and the future worth living for.~ Anonymous 

Monday, February 17, 2014

Design Wall At Last!

Design Wall by LaBellaColori Kira Bell


This past weekend my husband and I finally made a design wall for the quilt room. I have been wanting to do this ever since we moved in our home. I did a lot of research and found many different tutorials and examples. It's fun looking at all the other design walls out there, just google 'quilt design wall'. There are simple ones made by just tacking up a felt backed table cloth or felt to you wall to extreme design walls made with MDF and power outlets cut out.


We decided to go with affordable polystyrene foam insulation sheets that we found at Lowe's for just under $10.00 each. They are light weight 8 feet by 4 feet and 1/2 inch thick, one side is white the other silver with manufactures information printed on it. The room is about 11' x 10' and one wall where the long arm quilting machine is was the perfect place to make into a large design wall.

On the wall that is 11 feet wide we could easily fit the 8 foot length of the polystyrene. I wanted more than 4 feet tall so we took one of the sheets of polystyrene we cut length wise down to 2 foot wide. This made the design wall 6 feet tall and 8 feet wide. Not quite the whole wall but pretty big indeed!


Using spray adhesive we glued quilt batting to the white sides - this is important because the print on the other side would show through the batting and make an ugly design wall! Don't do what I did and leave one of the scanner stickers on under the batting, I promise it will show through the batting!

Once batting is on the main side we flipped it over trimmed the excess batting down to two inches and glued it to the back. We did this for both pieces. We could have duck taped the two together before covering with batting but for easier installation we left the two sheets separate. 


Once the two sheets are covered with batting we placed the 2' strip down first using 3M command strips stuck to the back of the polystyrene and made sure it was level and pressed it onto the wall. Then added the 4' wide sheet also with the 3M command strips.

Design Wall by LaBellaColori

And there you have it - one really awesome design wall!

Wednesday, February 12, 2014

Fun with Tutorials!

I thought after the first of the year that everything would slow down, but no. Just like everyone knows more things end up on the 'to do' list! But I can't complain because I am loving it all!! Doing more of the creative things I love to do.

I volunteered for the Emerald Coast Modern Quilt Guild Block Lottery and became the official Block Lottery Captain in January; and what an honor it is! I get to design and test block patterns for the guild. Check out our block for the March meeting...


I was really fun to sew up and easy too! The block lottery is a great way for our guild to raise funds, but it is also a way to learn new quilting skills or push yourself to use fabrics you might not have ever chosen. It is a free tutorial every month for anyone to use, even if your not a guild member it's avalable. I hope that these tutorials are helpful, educating and fun!!

The past two blocks were...


I am looking forward to future months!! I already have some great ideas ready.

Also I plan on making each one of these blocks to keep and then at the end of the year create a sampler quilt from them. I have a bundle of Denise Schmidt Chicopee and a nice bundle of low volumes I plan on using, the Chicopee just makes me smile so I think that will be my happy sampler quilt - finally some selfish sewing :)

So please if you see a block tutorial on the Emerald Coast Modern Quilt Guild Blog you like, by all means make some!! And please send me a pic I would love to see it!

Tuesday, January 21, 2014

Two Versions of the Sew Together Bag

I have been eyeing the 'Sew Together Bag' pattern by SewDemented on Craftsy for about 6 months. I finally broke down and purchased it in December.

The pattern description is "Do you love Sewing Together with your friends, but can't keep up with all the notions you brought? This was my dilemma!

The Sew Together Bag is a niffty little bag with three zippered pockets, four open pockets, a pincushion and a great little needle landing all held together by a zipper that forms two handles.

This bag will easily hold your 8" scissors, rotary cutter, marking pencils, seam ripper, extra needles, thread, snippers, and much more. It will amaze you how much you can hold in this fun and compact bag."


It is true this is a niffty little bag and it has loads of pockets!


I made one for my mother-in-law for Christmas, using stashed fabrics in her favorite colors of teal, blue and pinks. I used fusible fleece for the outer shell and quilted straight lines.

It is a great design! But (and there is a big but in there) I would not recommend this pattern to a beginner.


For the zipper pocket linings I used a bright pink to match the outer zipper.

The overall design is perfectly well thought out and all the zippers are great for storing small items that otherwise might get lost. With four open pockets and three zipper pockets you can carry a lot in this bag.


Then I made another one for the guild's zipper bag swap, my partner was Yvonne from 'That's Sew Creative'. I know she loves English paper piecing and the soft colors of Bonnie and Camille's Scrumptious.


So I just had to make the outside of the bag with 1" EPP hexagons. These fabrics are so very sweet and relaxing to work with. I used cotton batting and hand quilted with perle cotton the outside. I recommend getting longer than recommended zippers for the three inside pockets, that way you do not have to worry about sewing over the metal zipper stops. Stay with the size she has for the outside zipper, there is no worry of sewing over those zipper stops.


My overall review of the pattern is that the design is top-notch and the written directions are good. There are only 4 diagrams to reference and I even found them confusing. The lack of photos makes it very frustrating and the price is $12.00. Now the price is equal to the great design but not due to the lack of step by step photos but that's my opinion. Although once you have it figured out it is easier when making a second one. It is a challenging pattern but don't let it stop you from making one, the finished results are very rewarding!

Thanks for visiting!
Kira

Related Posts with Thumbnails